
SSL Certificate Management
SSL Certificate Management
All SSL certificate features are gathered here: the certificate folder (batch management), automatic application/renewal, bulk expiration check, and CA server configuration.
1 Certificate Folder
Batch management of certificates.
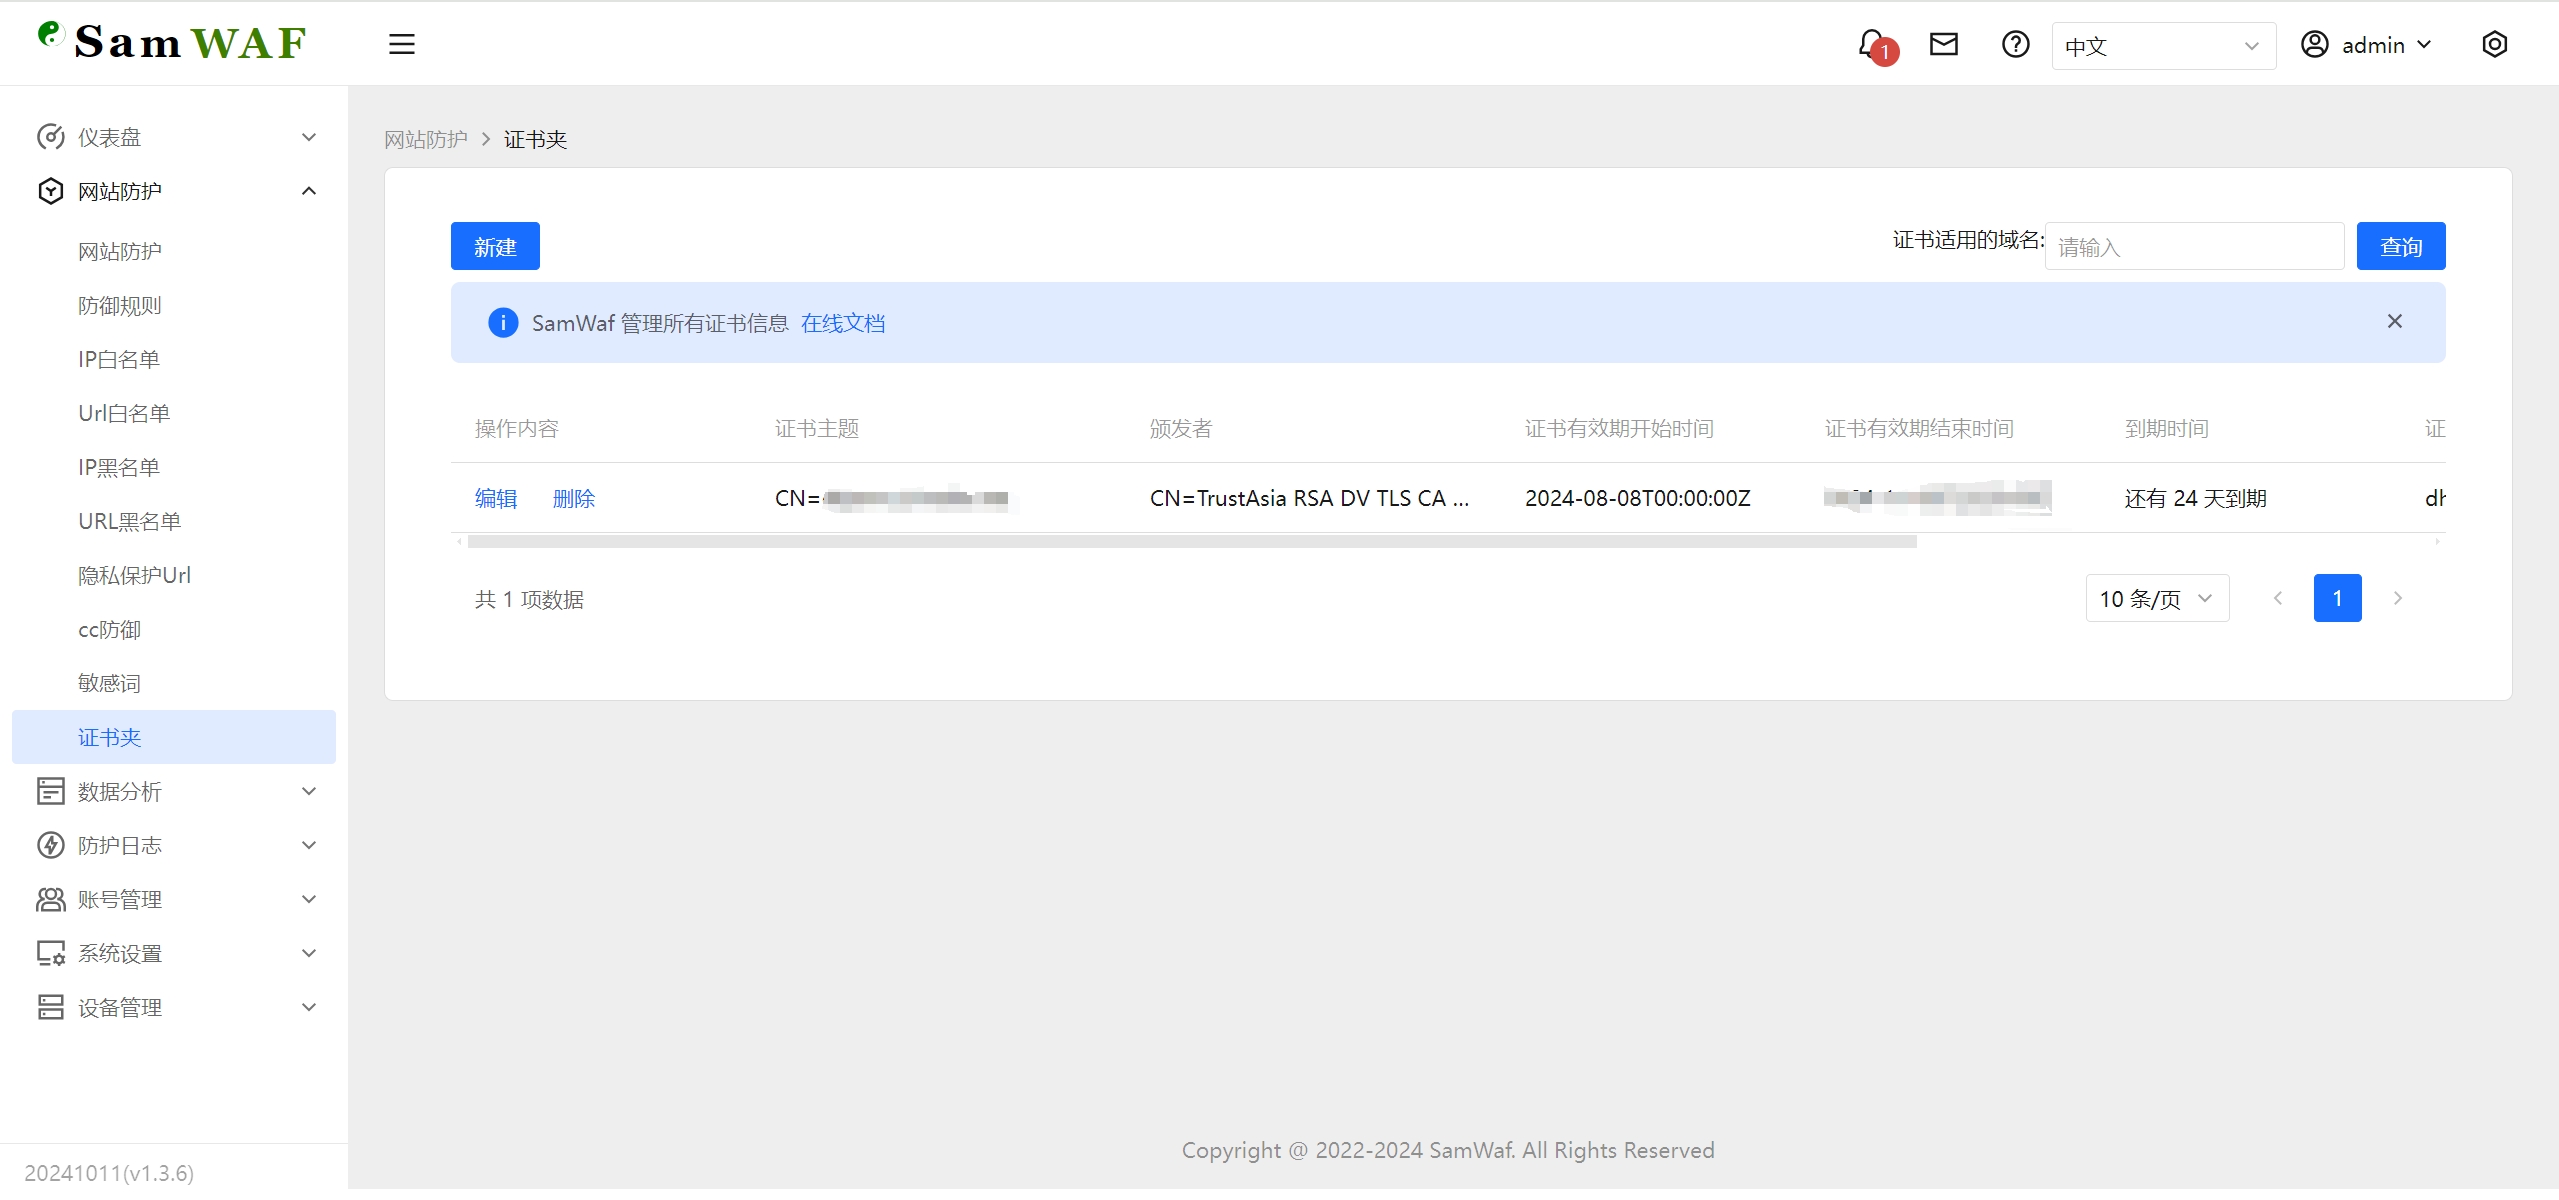
Permission
Adding, editing and deleting certificate folders are system-level operations (they can write files to the server via "Certificate Export" below) and are restricted to the System Administrator role; other administrator roles can still view the list and details.
1.1 Automatic Certificate Loading
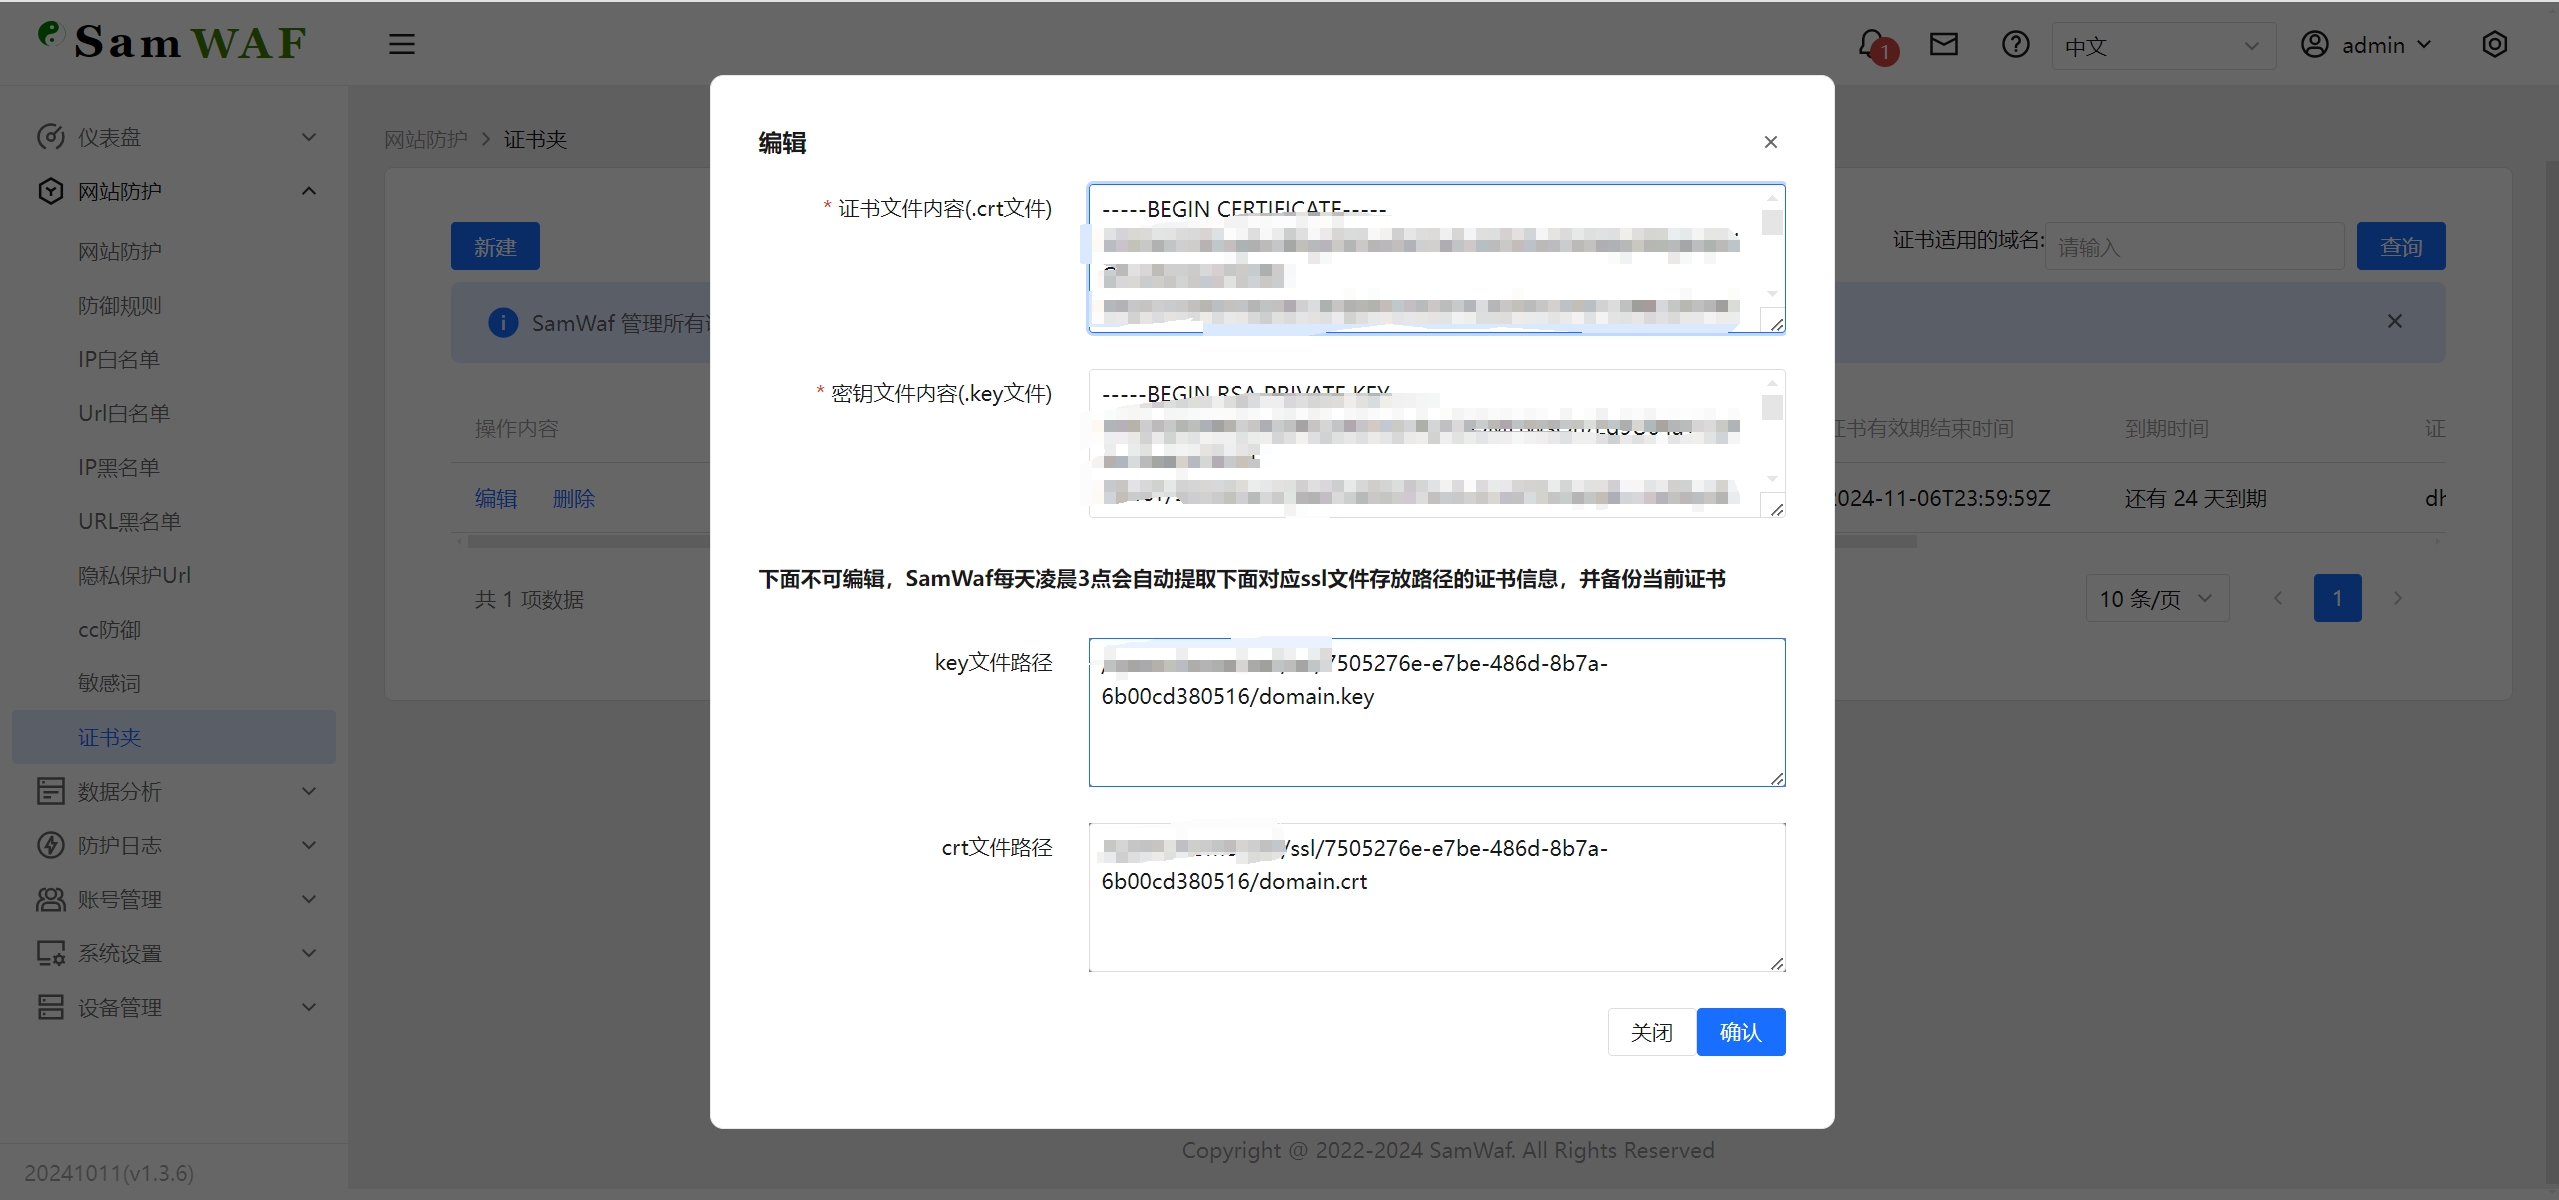
1.2 Certificate Export (Sync to Real Certificate Files)
If other programs on the server (nginx, for example) need the same certificate, SamWaf can write the certificate and its private key out as real files whenever the certificate is updated.
This is the opposite direction of "Automatic Certificate Loading" above:
- Key File Path / Crt File Path: read IN — at 3 AM daily the certificate is read from these paths and overwrites this entry.
- Export Crt File Path / Export Key File Path: written OUT — whenever this entry's certificate changes, it is written to these two files.
Configuration Steps
- Click "Edit" on the corresponding entry in the certificate folder list.
- Scroll down to the certificate export area of the dialog and fill in:
- Export Crt File Path: e.g.
/etc/nginx/ssl/a.com.crt(on Windows:D:\certs\a.com.crt) - Export Key File Path: e.g.
/etc/nginx/ssl/a.com.key(on Windows:D:\certs\a.com.key)
- Export Crt File Path: e.g.
- Click "Confirm" to save. The export runs immediately after saving, and the confirmation message includes the paths actually written.
Note: certificates can only be exported into allowed directories. By default only
data/ssl_export/under the program directory is allowed; to export into nginx's cert directory or elsewhere, declare it inconf/config.ymlfirst (see "Export Directory Whitelist" below).
When the Export Runs Automatically
Once configured, the files are kept in sync in all three of these cases:
- After an automatic certificate application / renewal succeeds;
- After you edit and save the certificate content on this page;
- After the 3 AM "automatic certificate loading" picks up a new certificate from the path.
Field Description
| Field | Description |
|---|---|
| Export Crt File Path | Full path the certificate is written to. Must be an absolute path including the file name. Leave empty to disable export |
| Export Key File Path | Full path the private key is written to, same requirements as above. Both paths must be filled in together |
| Last Export Result | Read-only. Shows whether the most recent export succeeded or failed, and the reason on failure. Hidden when export is not configured |
Path Requirements
- Must be an absolute path including the file name — a directory alone or a relative path is rejected.
- Filename extension is restricted: the exported certificate must end with
.crtor.pem, and the exported key must end with.keyor.pem. - The export directory must be whitelisted (security restriction, see "Export Directory Whitelist" below). Missing directories are created automatically within the allowed range.
- Both paths must be filled in together; filling in only one returns an error (an external program cannot use a certificate without its private key).
- They must not be the same as the "Key File Path / Crt File Path" above (that is the read-in direction, and writing there would overwrite your own source files).
- They must not be a path already used by another certificate folder entry, otherwise the two entries would overwrite each other.
Export Directory Whitelist (Security Restriction)
For safety, certificates can only be exported into allowed directories, to prevent writing to sensitive system locations:
By default, only
data/ssl_export/under the SamWaf program directory is allowed.To export into other directories (e.g. nginx's cert directory
/etc/nginx/ssl), the operator must declare them one by one insecurity.ssl_export_allowed_dirsinconf/config.yml(comma-separated), then restart SamWaf:security: ssl_export_allowed_dirs: /etc/nginx/ssl,/etc/haproxy/certsThis whitelist can only be changed in
conf/config.yml, never through the management UI.If an export path is not in an allowed directory, saving reports "export path is not in an allowed directory" — just add the target directory to the config above.
A Failed Export Never Affects the Certificate Itself
Export is an add-on action. A wrong path, a directory not on the whitelist, a wrong extension, a directory without write permission, or a locked file only produces a message on save and is recorded in "Last Export Result" — certificate application, renewal and activation are completely unaffected. Every export (success or denial) is recorded in the Security Audit log, so you can trace who exported what and when.
FAQ
Q: The files were not created. What should I check? Open the "Edit" dialog of that entry and read "Last Export Result": if both paths are empty, export has not been enabled yet; if there is a failure message, fix the path or the directory permission accordingly.
Q: How do I use them in nginx?
ssl_certificate     /etc/nginx/ssl/a.com.crt;
ssl_certificate_key /etc/nginx/ssl/a.com.key;
After a renewal, run nginx -t && nginx -s reload. SamWaf does not rewrite the files when the certificate content is unchanged, so scripts that watch these files are not triggered needlessly.
2 Automatic Certificate Application
Starting with v1.3.9-beta.7, automatic certificate renewal is supported. When the remaining validity period of a certificate falls below 30 days, the system will automatically initiate renewal based on the information from the last successful application.
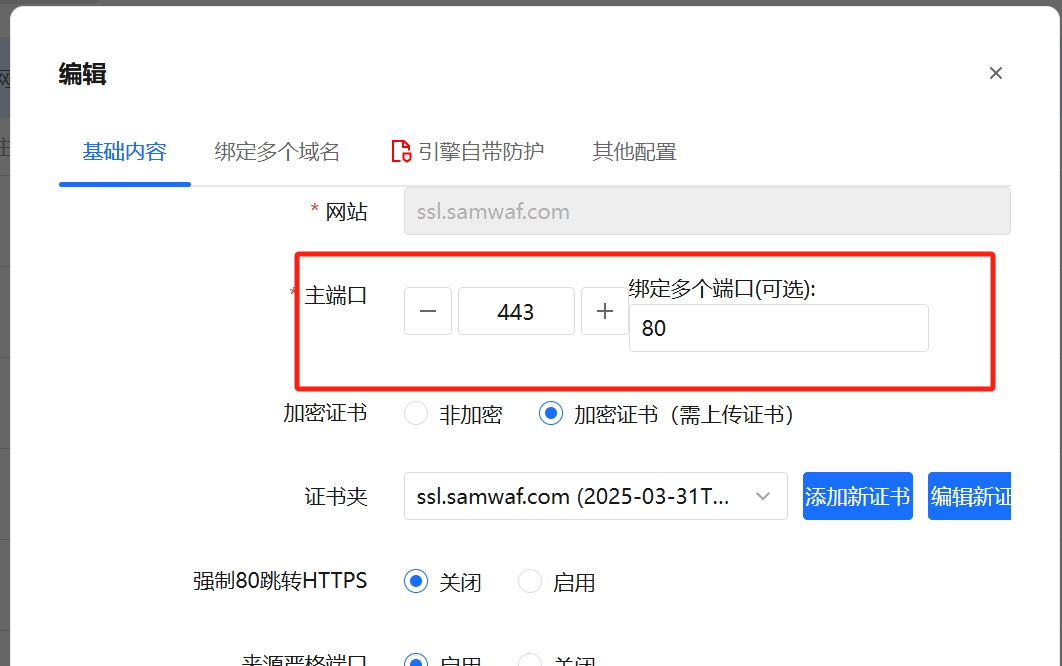
2.1 Adding Port 80 to Host Configurations
Currently, file-based validation requires port 80 to be available, allowing both ports 443 and 80 to be used simultaneously.
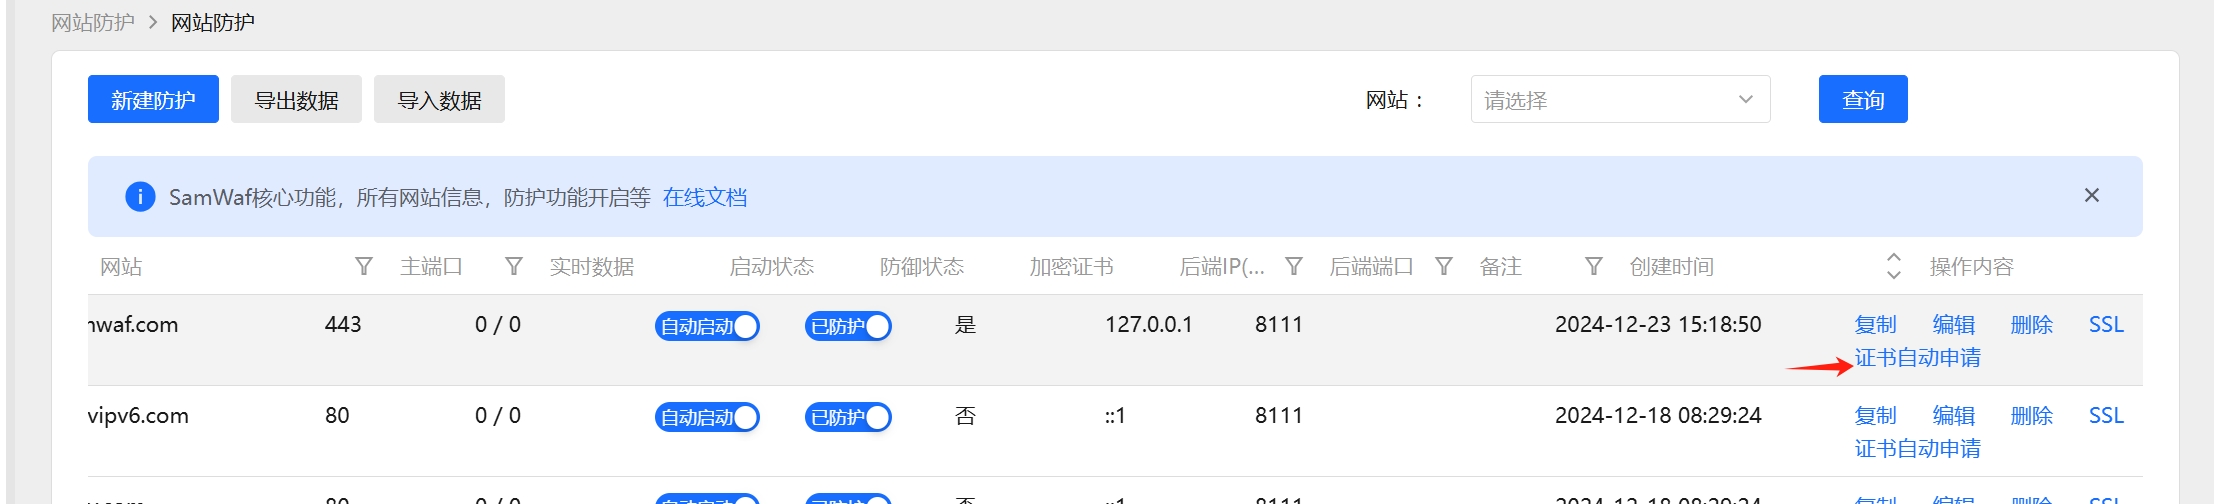
2.2 Initiate the First Application
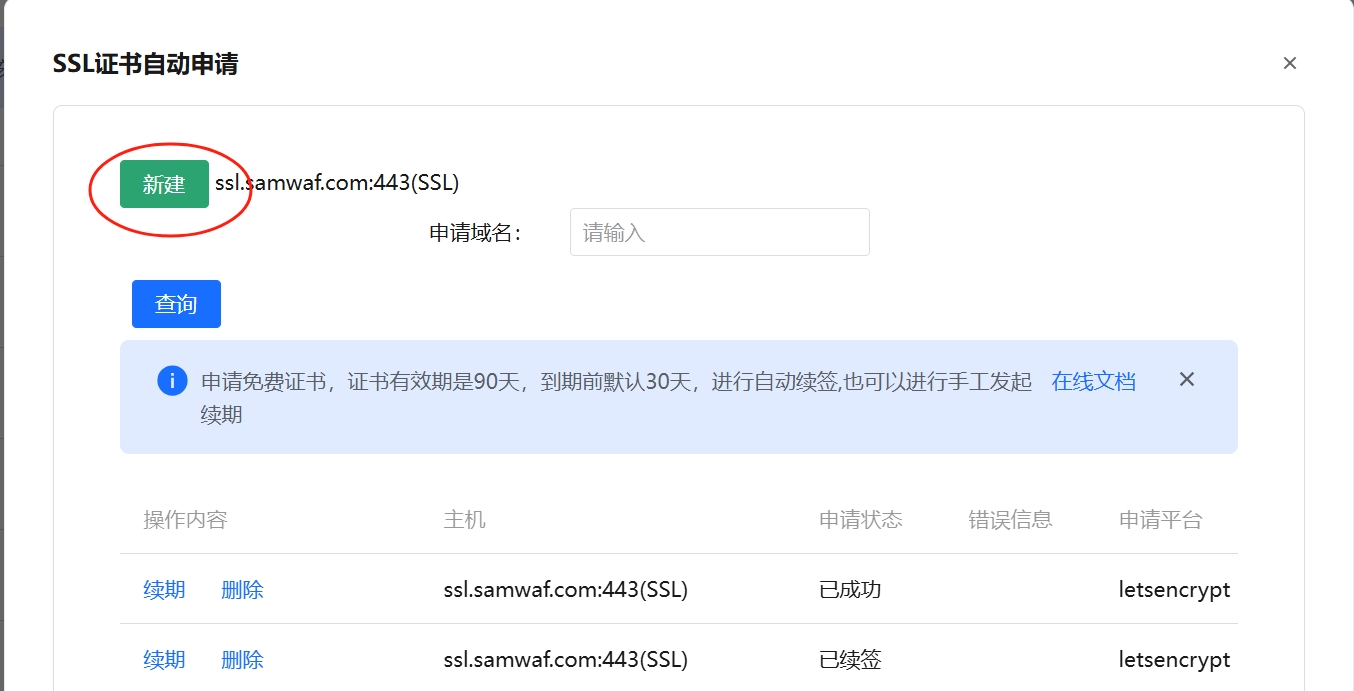
Click the "Automatic SSL Certificate Application" button.
2.3 Click "New"
2.4 Fill in the Application Information
You must manually enter the applicant's email address; the domain name(s) have already been automatically populated. Currently, certificates can be issued via file verification or DNS verification. When adding additional domain names, separate them with commas. Domain names containing wildcards must be listed first.
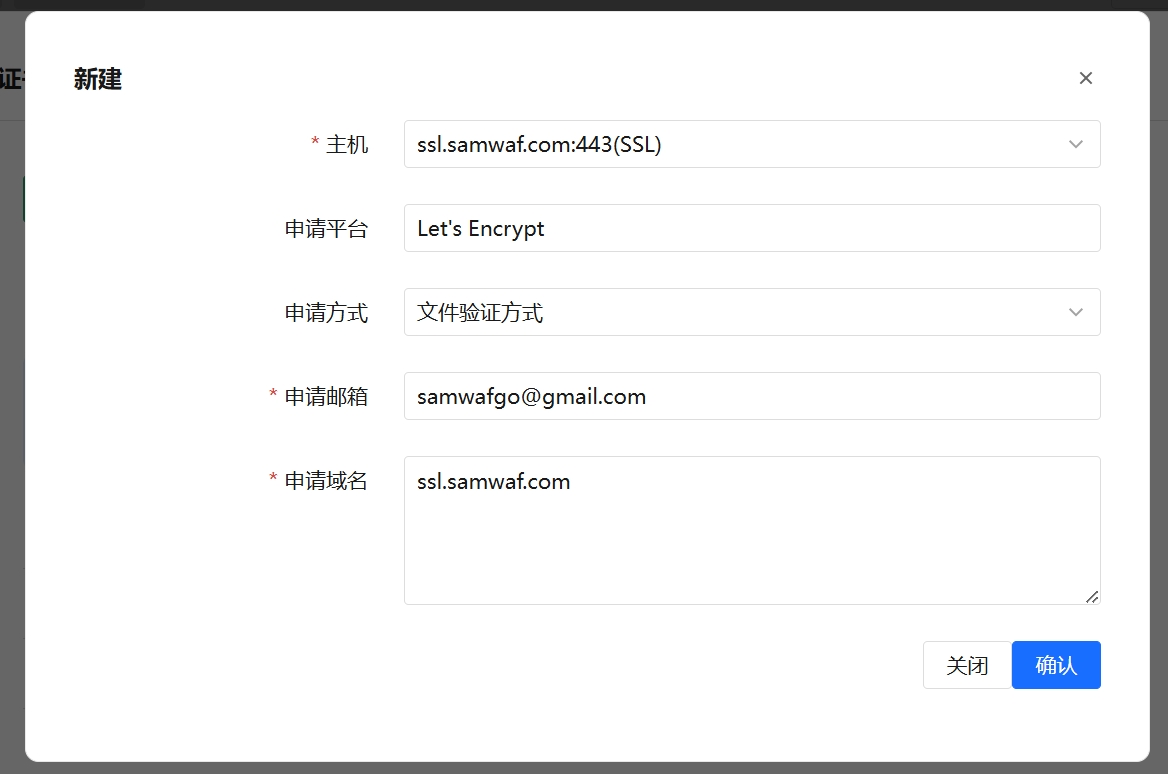
After clicking "Confirm," the system will automatically process the certificate application. After a short wait, click the "Query" button to view the result (whether the certificate application was successful) in the list.
File Verification and Port 80
When "Application Method" is set to File Verification, the form automatically checks whether the selected host's main port and bound extra ports include port 80; if neither does, a red hint appears below "Application Method". File verification (http01) requires port 80 to be reachable to complete validation, so add port 80 in the "Bind More Ports" field on the "Protected Hosts" edit page first.
Note: The default number of days is 30. You can configure this setting within the system by adjusting
sslorder_expire_day.
3 SSL Certificate Bulk Expiration Check
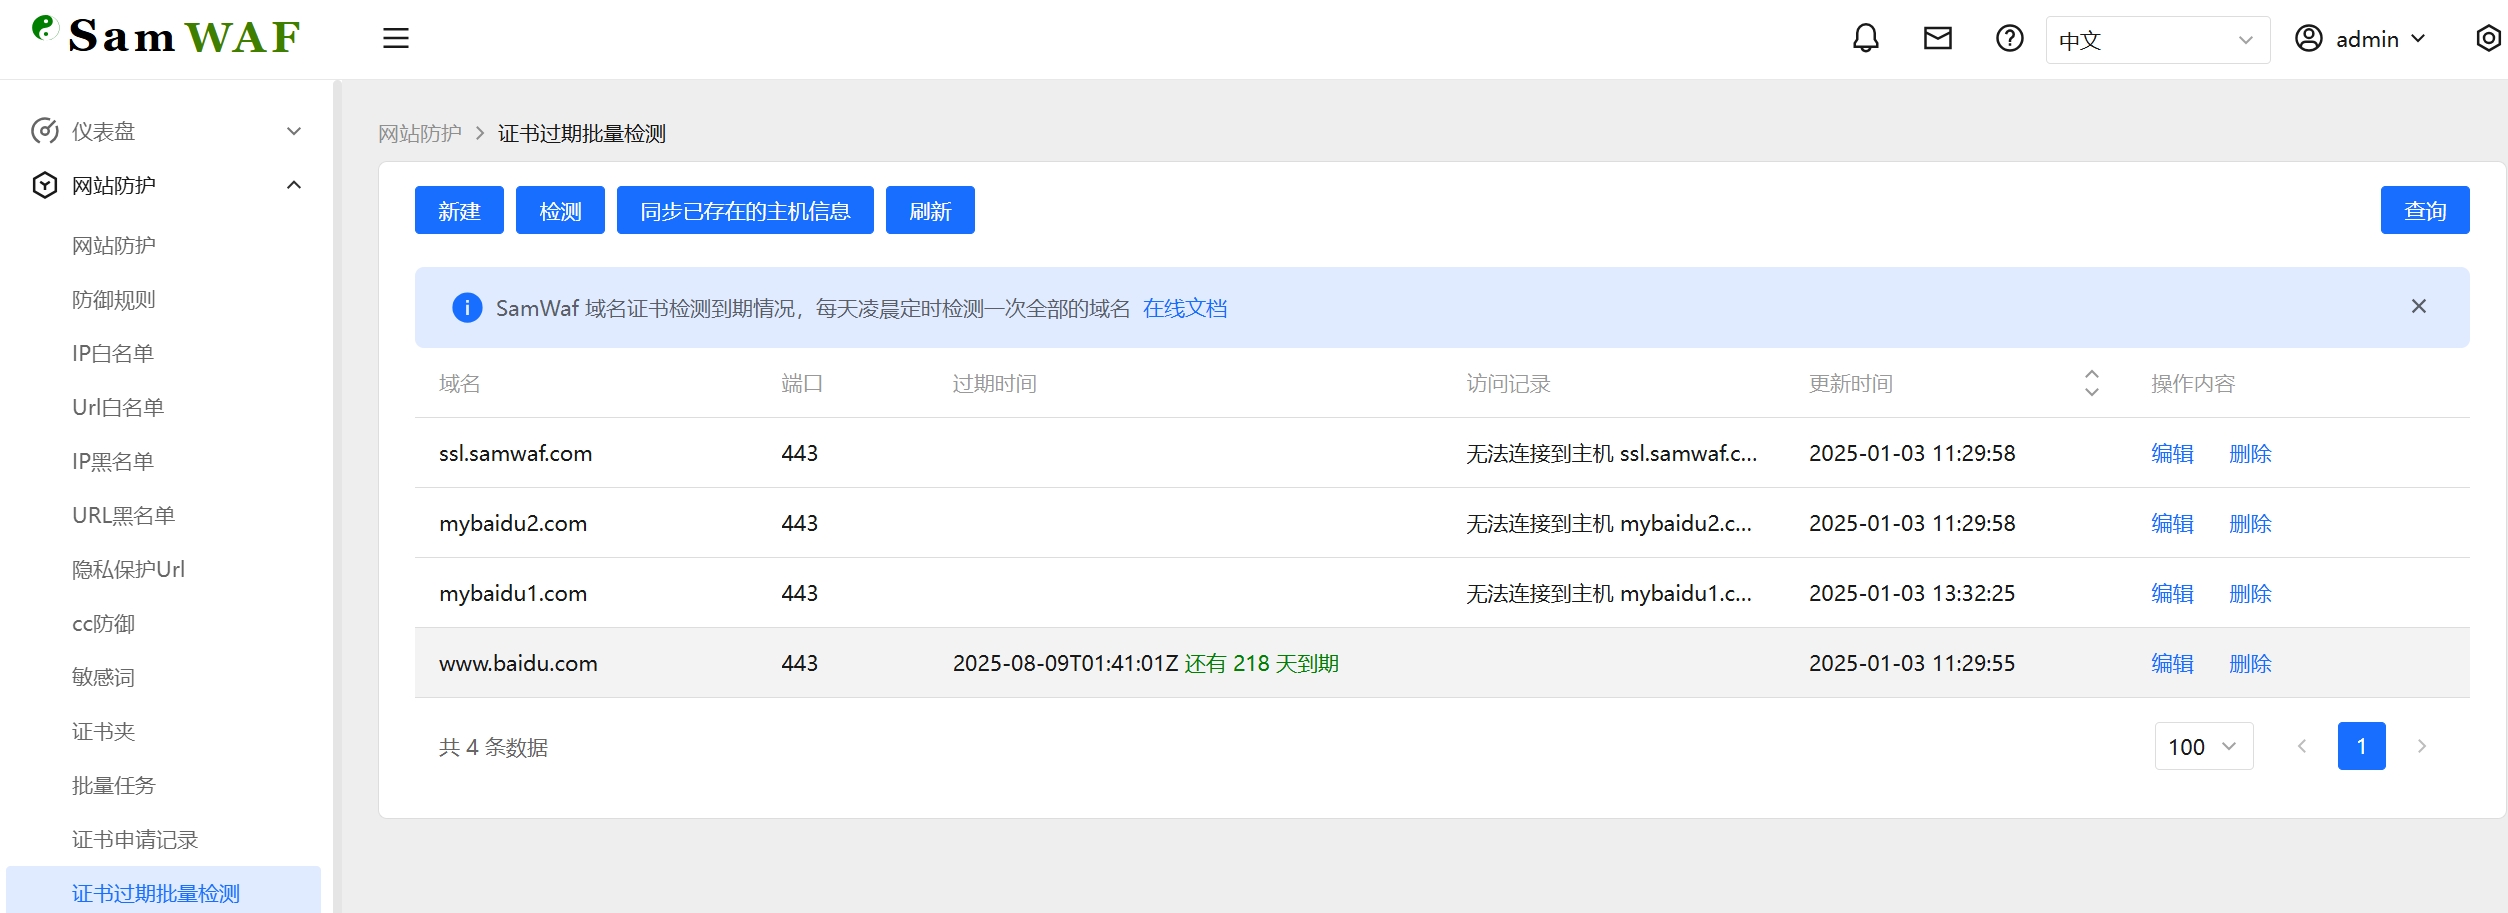
Supported since v1.3.9-beta.9, this feature automatically checks expiration status every day at 6 AM. It supports manually adding domains and ports, and allows one-click synchronization of SSL domains that are already under protection.
3.1 View Expiration Status
View the expiration status of SSL certificates for registered domains.
3.2 Synchronize Existing Host Information
Click "Synchronize Existing Host Information". This imports HTTPS domains under protection into the check list: existing ones are ignored, missing ones are added.
3.3 Manual Check
Click "Check" to initiate a manual SSL expiration check.
4 CA Server
Manage CA server information used when requesting certificates (ACME). During automatic certificate application, you can choose a CA server registered here as the issuing authority.
4.1 Add a CA Server
- Click the "Add CA Server" button at the top left to open the dialog.
- Fill in the "CA Server Name" (required) and the "CA Server Address", and optionally add "Remarks".
- Click "Confirm" to save.
4.2 Edit and Delete
- Click "Edit" on a row to modify the CA server name, address, and remarks.
- Click "Delete" and confirm to remove the CA server entry.
4.3 Field Reference
| Field | Description |
|---|---|
| CA Server Name | A label for the CA server. Required, used to identify and select it when requesting certificates |
| CA Server Address | The ACME directory URL of the CA server; certificate requests are sent to this address |
| Remarks | Optional additional notes |